Filters
Kayaking 101: Tips and Tricks for Beginners
The Ultimate Guide to Kayaking for Beginners
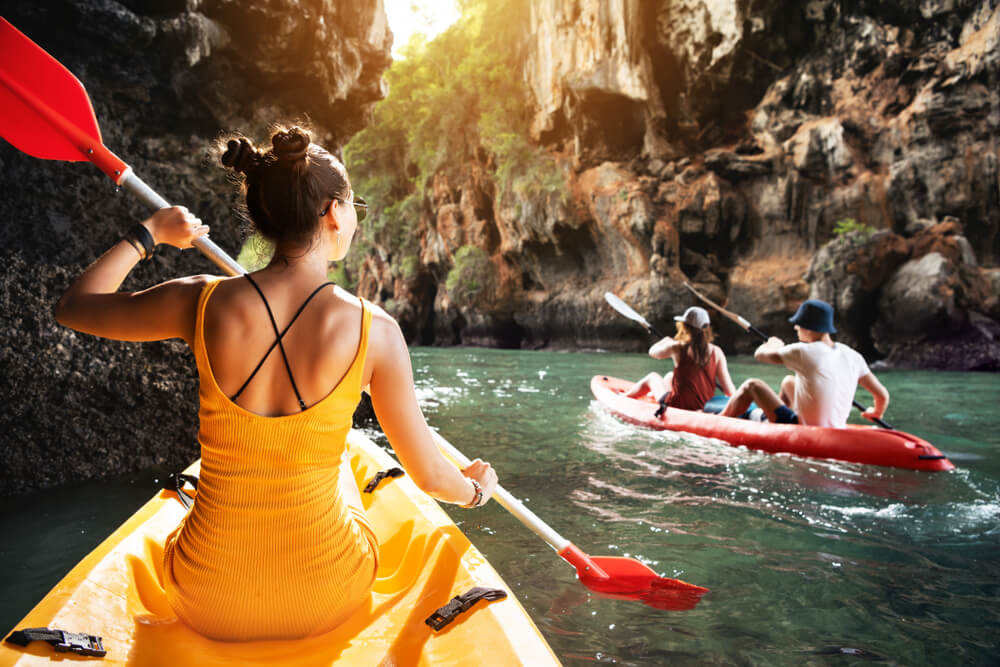
Kayaking is a versatile watersport and a great way to spend quality time with friends and family while exploring nature from a new point of view. The EZ Dock family is full of water enthusiasts who have fallen in love with the adventure that an afternoon of kayaking offers.
If you’re looking for a fun and exciting way to enjoy the open water, kayaking just may be the perfect new hobby for you. To get started, we’ve pulled together tips and tricks beginning kayakers should know.
Read the full article or jump to a specific section:
- Benefits of Going Kayaking
- What Do You Need to Go Kayaking?
- What Are the Different Types of Kayaks?
- Getting In and Out of the Kayak
- Techniques in Kayaking for Beginners
- How to Identify Your Paddle Blades
- What Are the Basic Types of Paddle Strokes?
- How to Position and Adjust Yourself in Your Kayak
- The Best and Worst Weather Conditions for Kayaking
- How Do You Kayak During Unpredictable Weather Changes?
- How to Right Yourself in a Kayak
- How Easy is it to Flip a Kayak?
- Kayaking in Different Environments
- Safety Tips and Reminders
- How to Transport a Kayak
- Where Can You Go Kayaking?
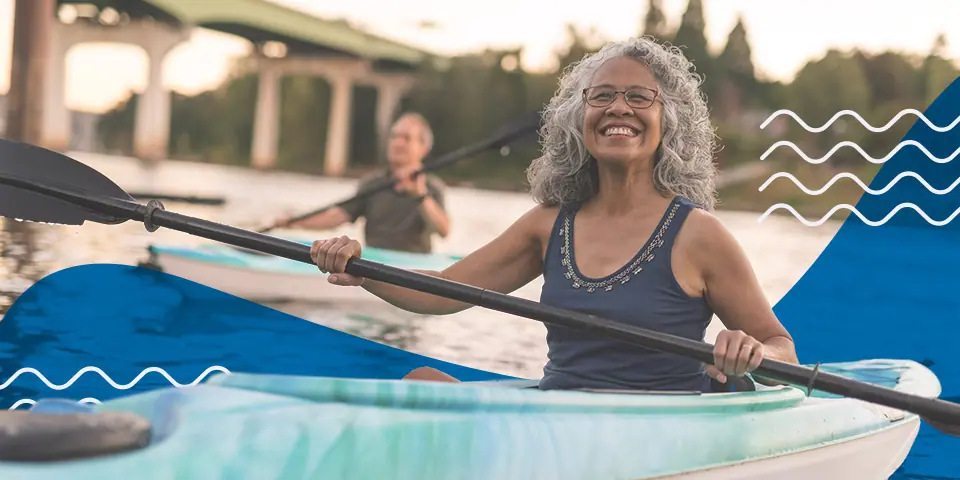
Benefits of Going Kayaking for Beginners
Once you try kayaking, we’re positive you’ll love it. Though many other watersports are fantastic ways to enjoy a day off the dock, we believe kayaking provides several advantages that make it unique to other activities:
- Kayaking is a fantastic exercise: If you’re looking for an outdoor exercise routine that provides a high-energy workout with low impact on your joints and tissues, kayaking is a worthy option. It can increase your cardiovascular fitness and strengthen your core, arm, back, shoulder and chest muscles.
- You can kayak in any body of water: Our wonderful world is full of diverse environments which can be explored from the seat of your kayak. Because kayaks are portable equipment you can launch from any shore, riverside or dock, you can take yours with you to many beautiful destinations. River, lakes, oceans and more — your possibilities for exploring are endless.
- Kayaking is a fun and exciting way to spend time with others: Grab a group of your closest friends and paddle down a river rapid or gather the family and enjoy a picnic after a relaxing coast on the lake. Kayaking can be as challenging or relaxing as you and your group desire.
What Do You Need to Go Kayaking?
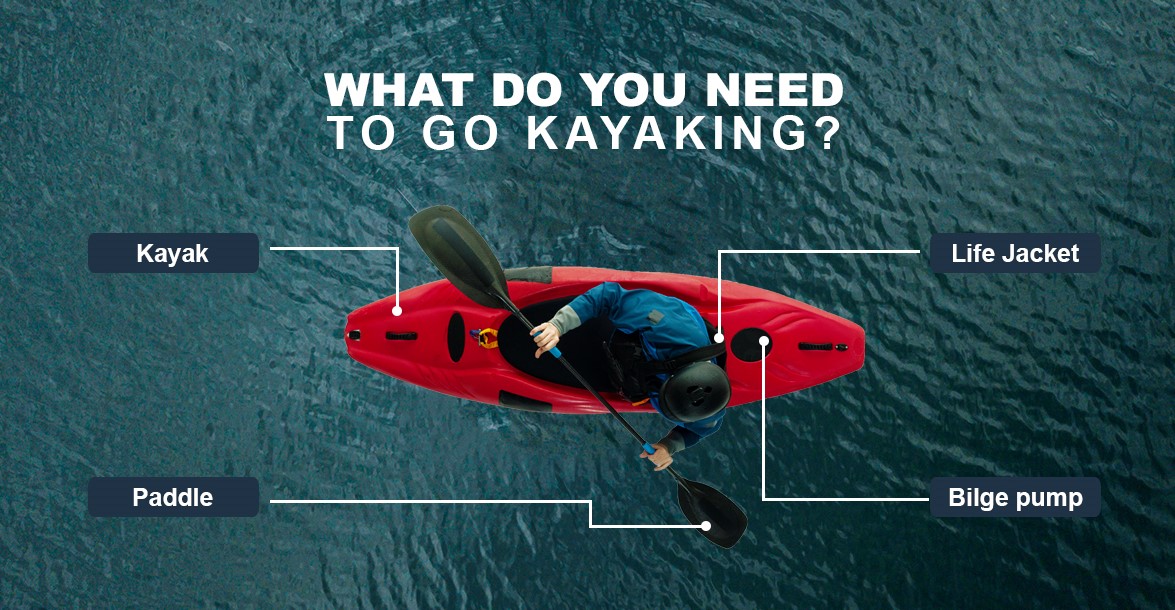
Of course, the first thing you’ll need to go kayaking is — you guessed it — a kayak. Other than that, depending on the type of kayaking trip you plan, you’ll need certain supplies. Besides the kayak, here are a few essential things you should take with you every time:
- Paddle: Your paddle is just as essential as your kayak. Before choosing a paddle, consider the width of the kayak you’ll be paddling and the measurement of your torso. There are sizing charts available but generally, torso heights over 28 inches will use paddle lengths of 200 centimeters and above, torso heights under 28 inches will use paddle lengths under 200 centimeters.
- Lifejacket: A Personal Floatation Device is a critical piece of equipment that you should always have when engaging in any watersport. A lifejacket should fit comfortably snug, meaning it fits well without feeling too tight or too loose.
- Bilge pump: Also known as a bailer, this pump is necessary in case you need to quickly remove unwanted water from your kayak.
- Maps or compasses: While many people rely on their smartphones for GPS, it’s important to bring a backup method of navigation in case your phone battery dies or you lose it in the water.
- Whistle or signaling device: Being out in nature is certainly relaxing, but it often means you’re isolated from other people. Bring a whistle or alarm device so emergency services can find you in the event of an accident or injury.
- Helmet or hat: As with any sport, it’s important to protect your head against sharp rocks and other objects in case your kayak flips over.
- Water and snacks: Even if you eat a hearty breakfast, always bring food and water with you to stay hydrated and keep your energy levels up while on the water.
Optional Items You Might Need While Kayaking
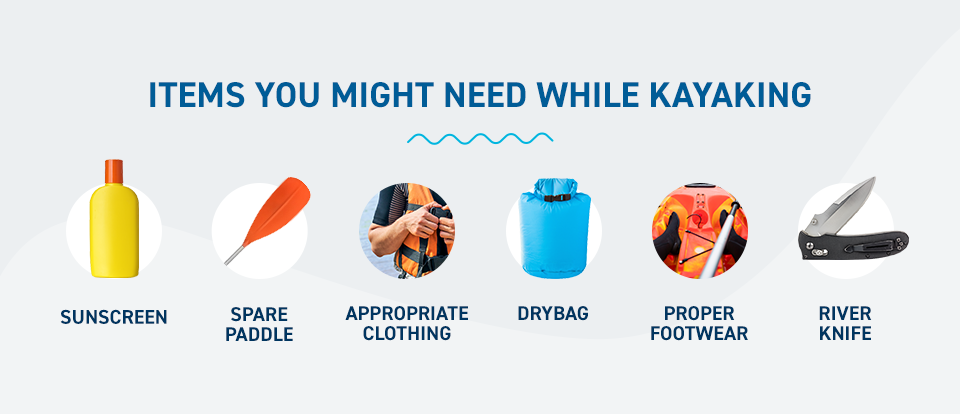
Aside from the essentials, here are some optional items you can bring to make your kayak adventure more comfortable and convenient:
- Sunscreen: Sun protection is critical, especially if you plan to be out on the water all day. Be sure to bring sunscreen with enough SPF to protect your skin from harmful sunburns.
- Spare paddle: Always bring a backup paddle in case you accidentally lose or damage the one you’re using.
- Appropriate clothing: Dress for the weather and check how the temperature will fluctuate throughout the day. Bringing extra layers in case you get cold is always a plus.
- Drybag with necessities: Bring a waterproof bag to place your phone, wallet, keys and other essentials in to prevent them from getting wet.
- Proper footwear: Provide your feet with plenty of support with adequate watersport shoes.
- River knife: Bring a knife so you can cut your kayak loose if you end up in an old fishing net or rope.
What Are the Different Types of Kayaks?
Need to determine which specific type of kayak you’ll need for your adventure? We have a whole guide dedicated to helping you choose the right one for your needs. Here’s a quick overview of the different types:
- Sit-on-top kayaks: This is a popular type of recreational kayak. Sit-on-top kayaks don’t have enclosed seats, so it’s easier to enter and exit compared to other types. These kayaks are generally better for beginners because they are wider and offer more stability.
- Touring kayaks: These kayaks are long and have smaller cockpits. Because they tend to be quite narrow and long, touring kayaks are a better fit for those with more experience on longer trips.
- Recreational kayaks: If you enjoy calmer, smoother kayaking experiences, recreational kayaks are ideal. These boats are shorter in length and have bigger cockpits for more storage and comfort.
- Whitewater kayaks: If you like a challenge when kayaking, you may find whitewater kayaks to be a good fit. These kayaks are often used in activities that require a bit more power and technique. Whitewater kayaks come in four types — longboats, river runners, creek boats and playboats — each of which has its own advantages depending on your trip plans.
- Inflatable kayaks: These kayaks are best used for a more relaxing water experience. Inflatable kayaks are easy to store, transport and operate, similar to sit-on-top kayaks.
- Child-sized kayaks: If you need smaller kayaks for children or teens, there are plenty of sizes available that accommodate their height and skill level.
- Single kayaks: If you’re sailing solo, a single kayak can be ideal. Single kayaks are often lighter, making them quicker on the water. These types of kayaks come in different sizes and designs depending on your adventure, such as fishing, touring, exercising or recreational paddling. Single kayaks are also easy to transport due to their compact frame.
- Double or tandem kayaks: These kayaks have two seats and require some coordination between both paddlers to maneuver in the water. Double kayaks often have more storage and are perfect for those who may not have the strength to steer on their own.
Getting In and Out of the Kayak
Before you learn how to ride in a kayak, you first need to learn how to get in and out of a kayak. Getting in and out of a kayak can be tricky, but we’re confident that after a little practice and training, you’ll catch on quickly.
Put simply, there are three different ways which you will likely enter a kayak — from the shore, dock or deep water. Each option has its advantages and challenges.
1. How to Enter a Kayak From Shore
Getting into your kayak from the shore is much easier, especially for those who are learning to kayak. Whether it’s a lakeside, seashore or riverfront, the best way to begin is to move the kayak as close to the shoreline as possible. You can then sit in the kayak and use your arms to push yourself into the water until you are floating on the surface. If you’re concerned about scratching your hull on the ground, move the kayak into the shallow water and climb in there.
Keep in mind that the shoreline you’re entering your kayak from will affect how easy the process will be. For example, you might be entering your kayak on a river, lake or beach shoreline.
Regardless of the terrain, the process of entering your kayak is similar:
- Line the kayak up so it’s parallel to the shore.
- Stabilize yourself by placing your paddle at a 90-degree angle behind the seat. Half of your paddle should be on the shore and the other half should be lying across the boat.
- Sit on the half of the paddle that’s on the shore and place your feet into the boat.
- Swiftly slide along the paddle and onto the kayak while holding onto the paddle underneath and next to you. The paddle and boat will hold up your weight during this movement.
- Move into the seat. Make sure to keep low and enter as smoothly as possible. Don’t forget to remain calm and focus on keeping your balance.
- Lay the paddle across your lap. Use your hands — or your paddle if you need an extra boost — to push off the shoreline.
2. HOW TO GET INTO A KAYAK FROM THE DOCK
Docks are convenient places to get into your kayak, but it takes a bit of finesse to pull it off. Try these steps to help:
- Lower your kayak from the dock onto the surface of the water, making sure to keep the kayak parallel to the dock.
- Place your paddle so it’s within an easy grabbing distance of the seat. You can also keep your kayak from shifting positions by placing either end of the paddle on the kayak and the dock.
- Remember, the higher you are, the more difficult it will be to enter the kayak. That means you’ll want to sit on the lowest point on the dock, as close to the kayak as possible.
- As you’re sitting on the edge of the dock, lower your feet into the kayak first. Then, quickly position your body toward the front of the kayak and lower yourself into the seat.
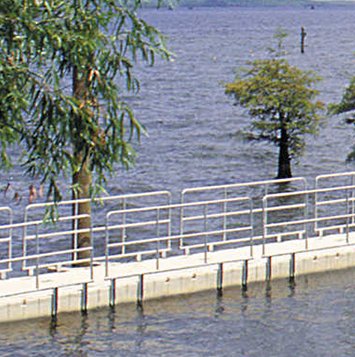
Looking to make this even easier? Consider a docking system with an attached launch — these are designed to make getting in a kayak, launching the kayak and redocking much more stable and significantly easier for kayakers of any skill level.
3. HOW TO GET INTO A KAYAK FROM DEEP WATER
There may be occasions when you will need to get into your kayak from deeper water. This is probably the most difficult kayak entry method, but with patience, it can be done. The biggest thing is to make sure your kayak is stable between each movement you make.
Here’s how you can do it:
- First, put one hand on either side of the kayak — one close to you and one across the seat opening.
- Pull yourself up onto your kayak so that your belly button is over the seat. Your legs will still be about halfway in the water.
- Next, twist around to get your bottom on the seat. Your legs will still be dangling in the water, but you should have most of your body in the kayak now.
- Make sure the kayak is stable, pull your feet in and put them in front of you.
How to Get out of a Kayak
The instructions for how you get out of a kayak are easy to remember — just complete the steps in reverse. When exiting on the shore, paddle your kayak into shallow water or as close to the land as possible. Swing your legs out of the kayak, gain your footing and stand up. When exiting the kayak on a dock, turn your body to face the dock and pull yourself out of the kayak.
Thankfully, many docking systems built today can easily accommodate kayakers of all abilities and skill levels. Our passion for spending time on the water has led us to create floating launch systems for your kayak or canoes to make getting in and out of the water a breeze. Our EZ Launch® Residential and EZ Launch Accessible Transfer System features launch rollers, guide rails and an adjustable floating platform that caters to the needs of all ages and abilities, meaning you can launch and dock your kayak with total confidence anytime.
Techniques in Kayaking for Beginners
Once you’ve practiced getting in and out of the kayak, it’s time to learn about paddling techniques. The first step is to ensure you have picked out a paddle of the proper length. Our guide to selecting a kayak offers detailed insights on choosing the right paddle length for you.
As with any sport, the proper techniques can keep you safe and help you prevent injury. The same goes for how to paddle a kayak properly. There is a correct way and a wrong way to do it.
Before getting into the water, all beginners should first learn how to handle the paddle. The part of the paddle you hold is called the shaft. The proper way to hold a paddle is to place your hands slightly farther than shoulder width apart on the shaft. Oftentimes, one mistake that beginner kayakers make is holding the paddle incorrectly.
One side of the blade is concave and should always be facing you. Place the paddle blade into the water, keep your knuckles pointed upward and maintain a relaxed but firm grip on the paddle shaft. This form prevents you from exerting too much energy while putting more power into your paddle.
Next, follow these steps:
- Sit in your kayak with a straight back and your legs in front of you. Make sure you don’t feel uncomfortable. Put a slight bend in your knees and rest them against the side of the kayak.
- Your kayak may have a pair of footpegs near your feet at the front of your kayak. Place your feet on the footpegs and keep a slight bend in your knees. If your knees are too close to your body or your legs are too straight, you may need to adjust your footpegs.
- To move forward, tighten your core while leaning forward to twist your torso and place the paddle into the water near your feet. Next, pull the paddle back toward you and remove it from the water. This should look like one swift motion in the water from your feet to your seat. Use this technique on both sides.
- If you want to stop your kayak, put your paddle in the water and hold it there. It will drag against the water. Your kayak will slow down and eventually stop.
- If you want to turn your kayak to the left, then paddle only on your right. If you want to turn your kayak to the right, then paddle only on your left.
HOW TO IDENTIFY YOUR PADDLE BLADES
Did you know there are different types of paddle blades? You can learn with any type, but you need to know which you have and how to adjust them if you have the option — which most paddles do.
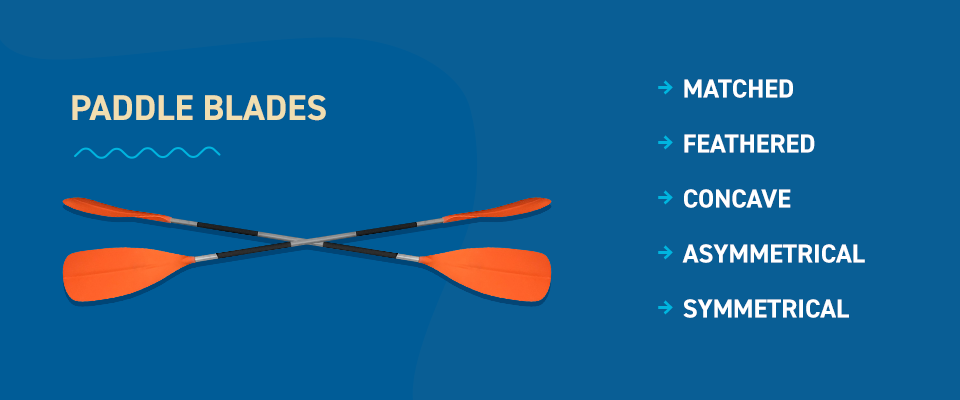
Here are some blade terms to know:
- Matched: Matched blades are easier to learn because the blades are parallel to each other.
- Feathered: The blades are at an angle to each other, which can reduce wind resistance on the blade not in the water. However, the blades likely can be adjusted to be matched if you’re just starting out. Look for a push-button mechanism in the middle of the shaft and rotate until the blades are parallel.
- Concave: Most blades are concave, or slightly curved. This shape helps you to move more water at a time, allowing you to travel faster.
- Asymmetrical: If one side of the blade is shorter than the other, then your blade is asymmetrical. This shape helps keep the paddle’s track straight and prevents it from spinning as it travels through the water.
- Symmetrical: With symmetrical blades, both sides are the same length, which gives it a characteristic oval shape.
While any paddle can get the kayaking job done, understanding the different blade shapes and types means you can pick the paddle for your specific type of kayaking — whether it’s paddling in a lake, kayak surfing or something in between.
What Are the Basic Types of Paddle Strokes?
With a paddle in hand, you can now learn basic paddling strokes. There four essential kayaking paddling strokes will enable you to move forward, backward or sideways in your kayak as well as help you turn around.
1. Forward Stroke
This basic stroke moves your kayak forward.
- Submerge one end of the paddle in the water near your toes.
- Next, propel the kayak forward by pulling the blade back towards your hip.
- While pulling the paddle blade out of the water, rotate your body forward while dipping the opposite blade into the water.
2. Reverse Stroke
This stroke moves your kayak backward.
- Submerge one end of the paddle in the water between your body and the stern, which is the back of the kayak.
- Look behind you and propel the paddle forward towards your toes.
- Allow your body to rotate back into a square sitting position and repeat the process on the opposite side.
3. Sweep Strokes
Use sweep strokes to turn your kayak.
To use this stroke to turn forward:
- Place the end of the paddle in the water by your toes against the bow, or front, of the kayak.
- Draw back the paddle in a half-circle movement towards the stern of the kayak.
- Use the paddle to turn your torso
To use this stroke to turn backward:
- Place the end of the paddle in the water against the stern of the kayak.
- Draw the paddle forward in a half-circle movement towards the bow of the kayak.
- Use the paddle to turn your torso.
4. Draw Stroke
Use the draw stroke to move your kayak sideways.
- Stick the blade of the paddle in the water in the direction you want to move and rotate your torso in that direction.
- The paddle should be far enough out from the kayak that both of your hands are over the water.
- Pull to draw your kayak towards the blade.
How to Position and Adjust Yourself in Your Kayak
Once you’re in the kayak, it’s important to pay attention to your posture and footing. After a long day of paddling and peddling, you’ll likely feel some muscle soreness, but correcting your posture as soon as you head out on the water can prevent some of this discomfort. Be sure to make all of the adjustments while on land.
Body Posture
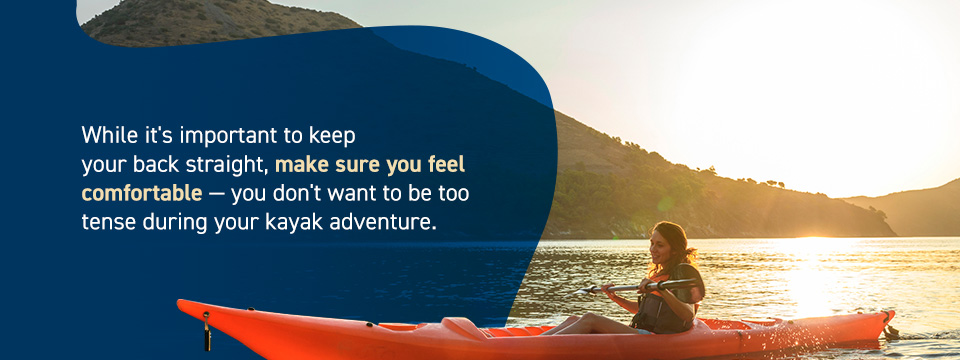
As soon as you get in the kayak, be sure to sit with a straight back and put your legs out in front of you while slightly bending your knees. Sit with your hips firmly against the seatback. This position can help you use your core and provide more stability and power with each paddle without straining your back.
While it’s important to keep your back straight, make sure you feel comfortable — you don’t want to be too tense during your kayak adventure. Most kayaks have an adjustable backrest that you can make tighter or looser to help you sit comfortably straight and avoid putting pressure on your lower back.
Foot Position
If you’re using a sit-in kayak, there should be a set of footpegs near your feet. If you place your feet on these pegs with slightly bent legs, your knees will naturally touch the side of your kayak. If you feel uncomfortable in this position or feel your legs are too extended or bent too close to your body, adjust the footpegs before you begin your journey.
You can adjust the footpegs by tilting them and sliding them on the track. If your knees are slightly bent and in firm contact with each side of the kayak, this is a good indicator that the balls of your feet are in the right position. This position helps you control the motion of the kayak as you paddle.
Other Beginner Kayak Tips and Techniques
For your first-time kayaking, or if you’re still newer to the sport and are heading out on the water alone, we suggest you follow these tips:
- Choose the right location: Pick a small lake or pond that is calm and one in which you can see the opposite shoreline. Bodies of water that don’t have heavy powerboat traffic are a plus because they will limit the number of unnatural waves you’ll have to face.
- Have others around: Launch your kayak from a shore that is visible to others on land. If you’re kayaking alone or are with a group that is remaining on the beach, your kayak will be in plain view should you require assistance or emergency help.
- Plan your first few trips to be short and safe: Choose a bright and sunny day that doesn’t have a forecast of rain or high winds to keep your environmental challenges as predictable as possible. Also, know your limits and underestimate the amount of time you can safely kayak before you get fatigued. Like other workouts, you don’t want to overdo your first kayaking trips and make it difficult to paddle back to shore. Limit your first trip to an hour and then extend as you feel comfortable.
THE BEST AND WORST WEATHER CONDITIONS FOR KAYAKING
Warm, dry weather, calm water, and thorough safety precautions make for amazing kayaking conditions. However, you’ll still want to pay close attention to the forecast and other signs of fast-changing weather. A spur-of-the-moment kayaking trip can be fun, but you also don’t want to risk getting caught in bad weather or in conditions that are beyond your skill level. So you will still need to do a little bit of planning.
Tips to help make your excursion enjoyable include:
- Planning a trip to a location where the conditions align with your skills
- Double-checking the weather forecast before you push off
- Wearing safety gear such as a flotation device or a wetsuit
- Using the buddy system and always have a go-to plan in case of emergency
- Researching potential hazards, such as rocks beneath the surface or currents that are stronger than they look
As a beginner, some of the conditions you’ll probably want to avoid include:
- Fog, because it reduces visibility and muffles sound
- Excessive wind and rain, which can make it difficult to see and maneuver your kayak.
- Busy waterways with a lot of boat traffic
- Polluted water, because you could accidentally expose yourself to harmful bacteria if you fall into the water
- Less-than-ideal or unstable weather conditions, since you won’t want to get stuck on a kayak in a dangerous storm
How Do You Kayak During Unpredictable Weather Changes?
Depending on where you’re kayaking, the weather could change in an instant. Although you planned a trip on a perfect day, you should still be aware of what to know about kayaking during times of bad weather.
You may not know how hard it is to kayak in a rainstorm until you’re stuck in one, but there are a few kayaking skills and techniques for beginners that can help you avoid trouble and make it safely back to shore.
Paddling in Windy Conditions
You should expect any amount of wind, from a small breeze to a huge gust, to have some effect on your kayak. This is normal, and you can readily compensate for it. To conserve energy, paddle with the wind and not into it if you can. You can also paddle harder, use a rudder or add an extra stroke to your downwind side to make adequate wind corrections.
If you lose control of your kayak, don’t fight it. Imagine driving down a road and losing control of your car due to ice, dirt or other slick conditions. Trying to regain control of the vehicle abruptly could cause you to overcorrect and make the situation worse. Instead, it’s best to maintain as much control of the car as possible and move in the direction of the vehicle. The same applies to kayaking. If you suddenly start to spin, move with the kayak and adjust accordingly.
How to Right Yourself in a Kayak
There’s also a chance your kayak may roll over, putting you underwater. Staying centered in the kayak and wearing a life jacket will help in this scenario. If you tip without wearing a life jacket, however, stay calm and immediately grab the kayak and the life vest if it’s attached to the vessel.
If you tip in calm waters, flip the kayak over by grabbing both sides of the cockpit and climb back in if you are able. If you are unable to do this, grab the kayak and swim back to shore or shallow water. If your kayak tips while you’re in a current, hold the kayak with just one arm. Continue to face upward to ensure you can breathe. Keep your body horizontal to the surface of the water and backstroke to the shore or shallower water.
How Easy Is It to Flip a Kayak?
Quite simply, flipping a kayak is more difficult than you might think. Most models are designed for extreme stability in various conditions on the water. Though it’s hard to believe, there may be some occasions when you want to flip a kayak on purpose. Many expert paddlers suggest learning how to flip a kayak because it increases confidence in the water, especially in challenging conditions such as the open ocean.
Learning how to flip a righted kayak is best done with help from a professional instructor. Chances are, you’ll learn two different types of rolls. One is called the sweep, or screw, roll, and one is called a vertical, or C to C, roll. Though they are slightly different, both types of rolls end in the same result when performed successfully: You, sitting upright in your kayak, paddling onward — albeit a bit wetter than when you started.
Kayaking in Different Environments
Now that you’ve learned a few kayaking tips and tricks, it’s time to learn some kayaking skills and techniques you can use in different bodies of water.
How Different Bodies of Water Can Affect Your Kayaking Trip
Each environment you choose to paddle contains variables that will impact the way you kayak. For instance, a flowing river may increase your speed naturally while a steady lake will require you to exert more energy to move faster. Regardless of which body of water you choose to kayak in, it’s a good idea to plan out a route ahead of time.
If you’re kayaking in a lake or pond, be aware of shoreline areas that you won’t be able to easily access in the event of an emergency. If you’re kayaking down a river or stream, make sure you choose a route with typically calm waters. It’s best to stay away from areas that could become more challenging if you accidentally paddle too far, especially if you’re new to kayaking.

Awareness Is Key
It’s also a good idea to identify spots on your route like bays or accessible shorelines where you can stop to take a break if needed. If you end up off course, make sure you have a nautical map or compass with you. Though GPS and other electronic navigational equipment are helpful, if they were to become inoperable, you would then have a reliable backup with a physical map.
You should also be aware of the many forms of wildlife you may encounter in both fresh and saltwater kayaking excursions. Oceans, inlets or bays may contain sharks or jellyfish. Rivers, streams or lakes could contain snakes, alligators or be frequented by other potentially dangerous wildlife on the shoreline, depending on where you’re kayaking. Before you journey out into the water, discover what species of animals you may encounter and how you can safely share the water with them.
Tips to Consider as You Advance
Once you’ve mastered how to kayak as a beginner, you may want to enhance your skill level and eventually take on whitewater kayaking. We don’t blame you — whitewater kayaking can be an exhilarating experience that allows you to view nature from a perspective like no other. If you get to the point where you’d like to consider taking on this challenge, here are a few whitewater kayaking tips you should know:
- Learn how to roll your kayak: There’s a good chance your first few trips whitewater kayaking will include capsizing. Learning how to roll and recover will keep you safe. Learning how to low brace will also prevent you from rolling in the first place.
- Make sure you know how to swim properly in whitewater: Whitewater rapids can be dangerous and not knowing how to safely swim through them can result in injury. Learn the techniques necessary to swim to safety if you end up outside of your kayak.
- Learn how to cross an eddy line and how to escape a hydraulic: An eddy line is a diving line between currents and a hydraulic is a hole in the river that can trap you. Knowing how to navigate these hazards will help keep you safe.
Safety Tips and Reminders
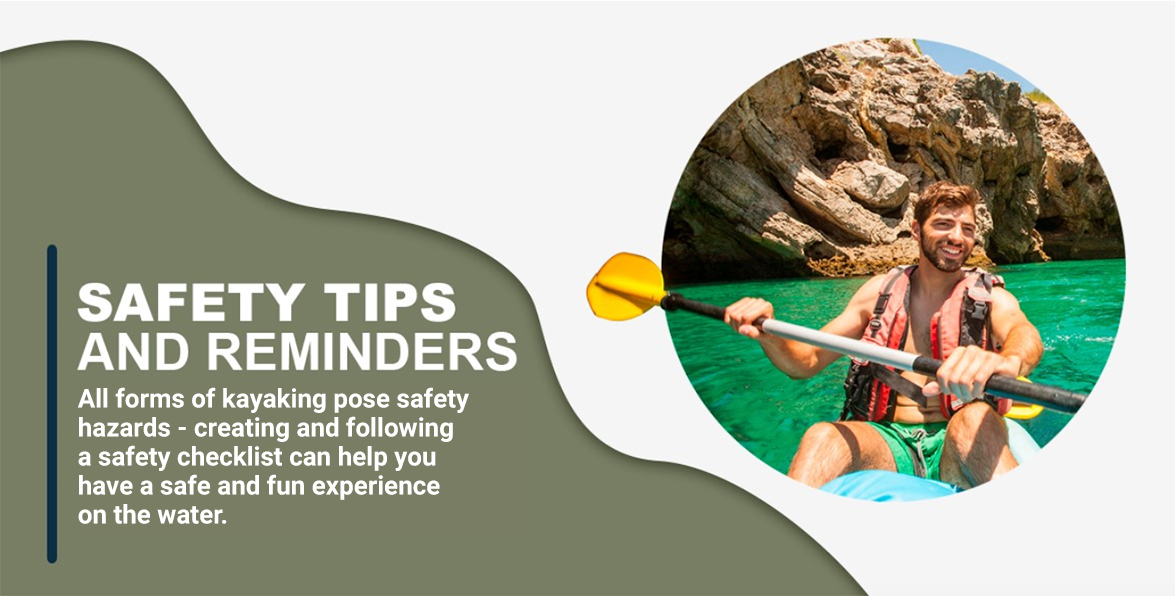
Kayaking can be a relaxing experience as you leisurely paddle out to the center of your favorite lake and enjoy the soothing serenity of nature. Kayaking can also be an adrenaline-filled ride as you test your skills on a river swelling with whitewater rapids. Though both activities offer completely different expectations of fun, all forms of kayaking pose safety hazards.
Just like boating, surfing and any other watersport, kayaking can place a kayaker’s health and safety at risk — especially if the individual fails to practice responsible safety precautions. Even though these dangers exist, you can still have a fantastic adventure in your kayak. Creating and following a safety checklist can help you have a safe and fun experience on the water.
Essential Safety Checklist
Before you head out onto the water, ask yourself these quick questions:
- Can everyone in your kayaking group swim on their own?
- Have you prepared a float plan mapping out the names of those who will be kayaking and your projected itinerary, and notified other friends or family members of the details regarding the trip?
- Are you prepared for sudden weather changes or low light conditions?
- Do you have a reliable way to call for assistance in the event of an emergency?
Essential Items for Every Kayaking Trip
Besides the kayak and paddle, here are a few things you should take with you every time:
- Sunscreen
- Spare paddle
- Appropriate clothing
- Helmet or hat
- Whistle or signaling device
- Drybag with necessities
- Water and snacks
- Proper footwear
- Self-rescue devices
- Maps or compasses
- River knife
Essential Rules for Safe Kayaking
Keep these critical rules in mind to ensure a safe trip:
- Never paddle alone: Always have a buddy when out on open water.
- Always wear a helmet and floatation device: A safe ride is a fun ride.
- Kayak sober: Never drink or use drugs while kayaking.
- Be honest about your kayaking abilities: Only kayak in waters you can easily navigate.
- Do not kayak in bad weather or rough water conditions: Always check the weather report and water conditions before kayaking. If the forecast looks rough, save your trip for another day.
While you should always exercise caution when engaging in any watersport or physical activity, kayaking can be a safe and fun experience as long as you practice it safely. Always pack your essential gear, understand the conditions of the weather and water and make every attempt to act as responsibly as possible. Remember — safe kayaking is smart kayaking.
How to Transport a Kayak
Whether you’re a beginner or a seasoned kayaker, getting your boat from the shop to your car to the water can be a tricky experience.
If you have a large pickup truck or van, you can simply place your kayak in the back and run straps across it to keep it secured. Alternatively, you can secure and transport your kayaks using a roof rack system on your vehicle. The number of kayaks you can fit on top of your car will depend on the size of your vehicle and the length of your kayaks.
Some of the essential pieces of hardware you’ll need to put your kayak on the roof of your car include:
- Side rails: These metal bars run along the side of the car roof on either side.
- Crossbars: These railings run across the width of the car roof and attach to the side rails.
Next, you’ll need to choose a rack accessory for holding the boat in place during transportation. Some of the most popular options are:
- J-style racks: Also known as J-cradles, these side-loading roof racks support the kayak at a 45-degree angle in a J-shape design.
- Saddles: These roof racks have padded platforms that extend to support the bottom of the kayak so you can transport it while it’s laying horizontally.
- Stackers: These vertical kayak racks allow you to arrange multiple kayaks on their side rather than flat as a space-efficient solution.
As a third option, you can also invest in a kayak trailer if you own multiple kayaks and engage in watersports often. Kayak trailers simply hitch to the back of your vehicle like any other trailer and provide plenty of storage to transport several kayaks at once.
Here are some tips for carrying your kayak from your vehicle into the water:
- Carrying a kayak with one person: If you need to carry your kayak by yourself, start by standing next to the cockpit. Squat down and grab the edge of the cockpit and pull the boat onto your legs. With one arm, reach across the boat and grab the underside of the cockpit. When you stand, bring the kayak onto your shoulder and find a balanced position before you begin walking.
- Carrying a kayak with two people: Transporting a kayak with two people is a bit easier. Have each person grab a handle at each end of the kayak and lift the boat. Be sure both people are facing the same direction to avoid making one person backpedal.
Where Can You Go Kayaking?
You can kayak virtually anywhere in the world with a large enough body of water. Unlike some other vessels, you can strap a kayak to the roof of your car and head out on a new adventure. You can explore calm lakes, river rapids, quiet creeks and serene seas. One of the greatest advantages of kayaking is you can have an exciting journey across the water both near and far. Here are just a few destinations where we suggest you remember to pack your paddle:
- Lake Tahoe, California and Nevada, North America: One of the world’s oldest lakes, Lake Tahoe is also among the most iconic bodies of water in the United States. With over two dozen beaches, you’ll have plenty of access to kayak the largest mountain lake in North America.
- Galapagos Islands, Ecuador, South America: Venture around the habitats of some of the most extraordinary wildlife on the planet. This stretch of islands in the Pacific presents a once-in-a-lifetime opportunity to witness what inspired Darwin’s theory of evolution.
- Southern French Alps, France, Europe: Get ready for a thrilling whitewater kayaking experience along one of the many rivers in the French Alps. The Bonne, Ubaye and Durance offer challenging rides for those experienced enough to navigate their waters.
- Moreton Bay, Queensland, Australia: This coastal region allows kayakers to choose from a handful of water types including rivers, creeks, inlets and lakes. You can island hop the Pumicestone Passage, relax in the open expanse of Lake Kurwongbah or get up close and personal with wildlife at Hays Inlet.
- Ha Long Bay, Vietnam, Asia: Take an adventurous paddle through one of Vietnam’s most popular tourist destinations. Float through grottos and islands enjoying the serene landscape.
- Lake Malawi, Malawi, Africa: Lake Malawi National Park is a UNESCO World Heritage site known for its clear waters and beautiful backdrop. Go on a safari like no other as you paddle past wildlife you won’t find anywhere else in the world.
- Lake Michigan: One of North America’s Great Lakes, Lake Michigan is accessible from Indiana, Illinois, Michigan, and Wisconsin.
From the sparkling waters of the Caribbean to the enchanting waves of the Adriatic, there are plenty of amazing places to kayak — including rivers, lakes and oceans that may be right in your backyard. Once you begin kayaking, your options for adventure are limitless.
Make Launching Your Kayak A Breeze
Are you ready to get out onto the water and begin your kayaking adventures? At EZ Dock, we’re confident that with a little practice, you’ll be on your way to mastering your new hobby. We want to help make your kayaking experience as smooth as possible with our EZ Launch® Residential. Unlike wooden docks, our EZ Launch® Residential won’t splinter or peel and is durable enough to endure extreme weather conditions.
Why are our EZ Launch® Residential floating dock systems ideal for your waterside?
- They’ve got integrated paddle notches to make launching and docking safe and effortless.
- They’re a one-piece system that rises and falls with the water level without incurring damage.
- They’re slip-resistant and won’t splinter, giving you a safe dock to walk on.
- The EZ Launch Accessible Transfer System goes beyond ADA requirements to provide kayakers of any age and ability a safe and convenient way to enter and exit their kayak.
To learn more about our EZ Launch® Residential, contact us today for a free quote or browse all our products.